Showing posts with label templete design. Show all posts

Tuesday, December 3, 2013

How to add Free Live Traffic Feed In Blogger Blog And Wordpress or Website

Live traffic feed is a excellent widget for blogger,WordPress and website. if you place it in your blog you and you visitors see who visit your website from where and which post they see. it help to incress page views in your blog because visitors see others visit history. it also incress the beauty of your blog side bar. so let's
know how to do it.

Add a free Live Traffic Feed

2.  click on Click to Select for color setting. 1
3. select width to incress option 2
4. next option select number of traffic feed and check the box where visitors come from
5. now select your platform from option 3
6. for blogger check blogger option if you add it automatically.
If you add it manually in your blog then select other blog or website.
7. for automatically setup now click on  GO and follow next step it very easy.
 See blew screen shot and do it carefully


For manually check other blog or website and click on GO 
1. Copy the HTML code in next page
9. go to your blog Layout and select a add a gadget 
10 . now select HTML/Javascript widget
11. now paste the copied code.
12. click on Save and views what is change your blog or website.

its a free software that means cost free widget
 If you get any helpful trick from my blog please share my blog in your social media site ot timeline

Saturday, November 30, 2013

How to add nice IP Address Widget in blogger or website

How to Add IP Address Widget

Add this widget in your blog doing blew steps
>> Go to your blog layout and  select Add A  Gadget  follow this arrow
[Blogger >> your blog >> Layout >>>  Add a Gadget ]
>> now  Select HTML/ Javascript click on [ + ]
>> paste blew code here


<div id="ipaddresse" style=" border-color:#EEEEDF; border:1px; border-style:groove; width:160px; padding:3px;">You are from <br />%%v_FLG%% %%v_IP%%<br />
%%v_CR%% ,%%v_RG%%, %%v_CI%% <br />
%%v_OS_IMG%% %%v_OS%%<br />
%%v_BRW_IMG%% %%v_BRW%%<br />
 %%v_I_RESO%% %%v_RESO%%  %%v_I_CLR%% %%v_CLR%%</div>
<script language="JavaScript" src="http://www.ipaddresse.com/js-widget-a1.php"></script>


>> now  click on  SAVE 

your widget looks like above picture

 if you faced any problem please comment


Add a Live Cricket Scorecard in blogger and wordpress- Blogger widget

Here is an excellent widget that give a excellent service  to your visitors. they see live cricket score when they visit your blog. It is very easy to add a live cricket scorecard in you blog.

How to a Live scorecard in blogger blog

## Just follow blew steps for it
1. Go to your blog Layout [ your account>> blogger dashboard >> your blog >>  layout]
2.  Click on  Add a Gadget
3. Now select HTML/javascricpt widget
4. Paste here blew codes


<script> app="www.cricwaves.com"; mo="1"; nt="n"; wi ="0"; co ="2"; ad="1"; </script><script type="text/javascript" src="http://www.cricwaves.com/cricket/widgets/script/scoreWidgets.js"></script>


5. now save your  widget.

You have successfully do this now view your blog and enjoy it

Sunday, November 17, 2013

How to Add a free generated privacy policy in blog or website -blogger and wordpress

Privacy policy is a common page in every professional blog or website. it is inform to visitors what kind of roll play here and data use purpose. If you want to publish Google adsense ads you must need privacy policy page because  it is a term and condition of google adsense.
So we generated a privacy policy page or post in online. and providing our blogger blog term and condition.

see also: add a nice contact us form in blogger

How to  generated  privacy policy for blogger 

you can create a privacy policy page or post by doing blew steps


1. we create it online and 100% free. so go to here now  click me  
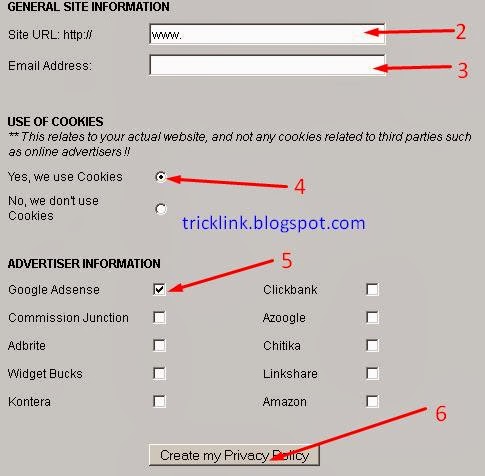
2. now put there your blog/website url in red marked 2. see blew picture
3. now type your email in  marked option 3
4.don,t forget to check it .
5. this is very important option for add ads publisher. if you  want to publish adsense ad check like picture.
if you use others network please check it carefully
6. now click on Create my privacy policy  

now check your email and copy the code which is sent by serprank  
7. now goto you blog layout and click add a gadget then select HTML/Javascript 
8.paste here your copied code. then save it

How to add privacy policy page

9. go to your blog dashboard   and click on pages. see here like blew


10. now click new page and select blank page then paste your copied code from serp rank and save it.
11. now publish it.   you can create a post for privacy and policy.
12. visit your privacy policy page or post and copy page or post link
see your blog like something blew picture


13. go to your blog templete and search privacy policy and paste link insted of #.

14 .save templete 
you are successfully done it.

Friday, November 8, 2013

How to Add a favicon(logo) in your blog or website

Favicon is the icon or logo of your website. your can adjust simple or animated favicon in your blogger blog.
 it help visitors to separeted  your blog from others in title bar. it also incaress your blog beauty.
you can do this easily. today i share how to do this. i share how you can turn a picture to favicon. see the
picture
1. this is the default favicon in blogger.(1)
2. this favicon is after customize(2)
============================================

How to add a favicon in blogger

============================================

We do it by 2 steps

1. create and download favicon
2. add favicon in your blog

# step=1

I share here 2 website where you  will create your favicon

1. Favicon generator

This is a great website where you  can create your own picture turned favicon and choose a favicon from gallary. 
1. create favicon from your own picture. it is very easy. go here >> Favicon generator 
 see the blew photo.


1. browse or select a picture from  your computer.
>>  you can change Favicon  size.
2. now click in geneate Favicon
3. now click on Download Your favicon here. or see blew

.
>> now you successfully download logo  or favicon.

Download favicon from gallery

Go to  favicon gallery or see blew 


>> now select a favicon or Icon, logo and download it.

2. genfavicon.com 

This website is  also a favicon generate website. here you can customize your favicon or logo as your wish.
1. Go to genfavicon  and select a picture from your computer then click on  upload image
2. editing picture by using mouse. then click capture & preview
3.now download  favicon from download favicon style. see blew picture


# step=2

>> now we add favicon in your log.
>> Go to your blog >> blog layout >> in 1st widget where you see blogger logo click here edit. like blew


>> now click on  browse and select your created or downloaded favicon  then click save. follow blew

>> now save arrangement and view blog to see changed favicon.

please comments if you feel any problem.

Tuesday, November 5, 2013

How to search code in templete quickly for Edit templete

Blogspot is largest free blogging platform which is provid you many feature like CMS (content management system).. you can customize any part of your blog in Blogger.so you need to Edit templete in HTML or CSS.
 there is a option for  edit HTML .
---------------------------------
By this option you can Customize
------------------------------
1. MENU
2. Popular post
3.add  notification bar
4. header
5. bannar
6. page number
7. labels
8. download option
9. social sharing menu
10.  even whole templete
if you customize or Edit any option you need to find specific code in templete. but new version of blogger templete edit option  the search option is disable. but we do it in different way.
====================================================
Search code in blogger templete
====================================================
1. Go to your blog
2. Go templete>> Edit HTML
3. COPY  whole templete and paste it notepad, (notepad is a word editing tool automatically installed in windos)
4. now see blew picture

5. click in search on top bar and click in find.(  Ctrl+F)
6.  Type desire code in search box which you search for editing
7. now click in find text
8. now you see it with column number.like above picture.
9. now find this number in editing option in blogger.
you can get is easily.

so now you can edit your templete quickly.

Add popular posts widget with auto numbering for your blogger

Many kind of popular posts widget you can use in blogger by customize it. today we share one kind of simple and light popular widget for blog. this widget looks very beautiful and auto numbering system.you can change it any time later,so don't missed it.
===================================

Add popular posts widget

===================================
1. Go to your blog then go to layout
2. click add a gadget
3.select popular posts click on + in next page
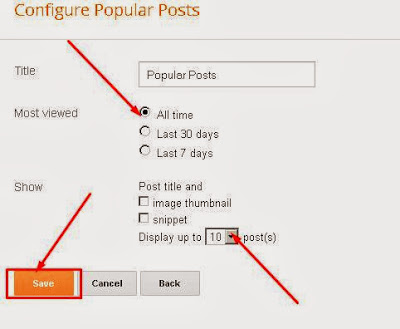
4. now see blew picture

5. you can change the number of posts by changing the number oon dropdown.
6. now click in save

=====================================
Customize popular posts widget
===================================
1. go to Templete
2. click on Edit HTML
3. NOW SEARCH ]]></b:skin> or  <b:skin>....</b:skin>    expand it then you see ]]></b:skin>
4, paste the blew code before ]]></b:skin>

-------------------------------------------------------------------------

/*--- MBT Popular Posts --- */
.popular-posts ul {
padding-left: 0px;
counter-reset: popcount;
}

.popular-posts ul li:before {
list-style-type: none;
margin-right: 15px;
padding: 0.3em 0.6em;
counter-increment: popcount;
content: counter(popcount);
font-size: 16px;
background: #292D30;
color: #ffffff;
position: relative;
font-weight: bold;
font-family: georgia;
float: left;
border: 2px solid #dddddd;
box-shadow: 1px 2px 9px #666666; }

.popular-posts ul li {
border-bottom: 1px dashed #dddddd;
}

.popular-posts ul li:hover {
border-bottom: 1px dashed #696969;
}

.popular-posts ul li a {
text-decoration:none; color:#5A5F63;
}


.popular-posts ul li a:hover {
text-decoration:none;
}

-------------------------------------------------------------------------


4. now click on Save Templete

you are successfully done it

Monday, November 4, 2013

How stop or disable tracking or counting your own page views

Today I share a trick which is" How stop or disable tracking or counting your own page views". it is a very useful option to know accurate visitors or page views in your blog. we need to visit or page views our own blog many times in a day.because we want to how look the post after publish a new post.we also  need to visit own page for reply visitor comments.blogger has not useful  automatic tracking system which stop your own page views.but there is a option for tracking or stop tracking your own pageview.

we know it is most helpful trick for newbies in blogger to know how popular their blog like me.

so now we do this easily.

==========================================

Do blew steps carefully for stop tracking own pageviews
=========================================

1. go to your blog dashboard
2. Go to >>stars>>overview

3. now you see here in right side blew picture and click on marking option.


4. see blew image and carefully follow instruction


5. check on Don't track my page views if you want to stop tracking your own page views.

6. check on Track my page views  if you want to track your own pageviews.

7. click on Save

do this again if you use another browser for visit your blog . do this from this browser also.

Yahoooo you really done it

Saturday, November 2, 2013

Add slider About Author profile

Slider About Author profile is one of the best widget for blogger platform I EVER SEEN.
"About me" is the hidden condition of adsence, but most of newbies do not know this secret.
abut me or about author is also help to blogger grow popularity.
it never increase page loading time beacuse it is HTML Code
---------------------------------------------
A about author by completing blew steps
-------------------------------------------
1. go to your blog
2. goto layout
3. click add a new widget and select HTML/Javascript
4. paste blew code
----------------------------------------------------------------------------------------------------------

 <h2 class="title">About Me</h2>
<div class="widget-content">
<!--[if !IE]> -->
<style>
}
#probloggertricks:hover
 {
border:2px solid #ccc;
cursor:pointer;
}
.opacity
{
opacity: 0.5;
margin-right: 50px;
-moz-transition: all 0.5s ease-out;
-o-transition: all 0.5s ease-out;
-webkit-transition: all 0.5s ease-out;
-ms-transition: all 0.5s ease-out;
transition: all 0.5s ease-out;
-moz-transform: rotate(7deg);
-o-transform: rotate(7deg);
-webkit-transform: rotate(7deg);
-ms-transform: rotate(7deg);
transform: rotate(7deg);
}
.opacity:hover
{
-moz-transform: rotate(0deg);
-o-transform: rotate(0deg);
-webkit-transform: rotate(0deg);
-ms-transform: rotate(0deg);
transform: rotate(0deg);
-moz-box-shadow: 1px 1px 4px #000;
-webkit-box-shadow: 1px 1px 4px #000;
box-shadow: 1px 1px 4px #000;
}

</style>
   <!--[endif]---->


<style>
#probloggertricks
{
border:2px solid #888; margin:2px 5px 0px 0px; padding:2px;
}
#profileAditya:hover
 {
border:2px solid #ccc;
cursor:pointer;
}

.opacity:hover
 {
opacity: 1;
-moz-box-shadow: 1px 1px 4px #000;
-webkit-box-shadow: 1px 1px 4px #000;
box-shadow: 1px 1px 4px #000;
}

</style>

<img class="opacity" id="probloggertricks" src="http://lh5.googleusercontent.com/-apebLD7wqCc/AAAAAAAAAAI/AAAAAAAAAbA/TEzvNCR6ubk/s512-c/photo.jpg" width="100" />
<div style="font-family: Arial Tahoma Verdana; font-size: 13px; text-align: justify; ">
<b>Founder & Author:</b> Hi Friends, my name is Ataur Rahman Dipto student of electrical and electronics engineering 20 year old blogger, certified SEO consultant & web developer , the Entrepreneur of <a href="http://www.tricklink.blogspot.com"> <b>Trick Link</b></a> who based out of the beautiful country name "Bangladesh". He is a problogger & running a number of blogs from his living room</div><a style="color:#5634;" href="http://tricklink.blogspot.com/about me.html" target="_blank">...Read More</a><!--![endif]---->
</div>
-------------------------------------------------------------------------------------------------------------

replace coloured code with your own

1.replace this color link with your image link

2. replace this color link with your Bio

3. change this link also with your about me page link

now save
you successfully done.

Add customize cloud labels in blogger~templete desingning


In blogger or website labels plays a vital role to stay visitors long time with your blog. because labels are shows what kind of post or content you already have. if it's random , you can customize it to incrage outlooking  and make it so beautifull. after doing it you see results   after some days. your page views are increse.
some of customize templete of blogger have it already but it not show as customize because it also depends on your blog labels setting. so you can do it simply but  if your not have it then you need to copy asn paste some code in your templete.  don't warry it so easy.

========================================================

Customize labels by following blew steps 

====================================================


Turn random to cloud:
1. Go to your blog layout
2. Click on edit option right side of Label, if you not see any widget of named label plese click Add new widget and slect Label widget from this page. then edit sttings like blew

3. click on marked check
4. now click in cloud check
5. save label configuration.
6. now click on  save arrangement and also click on view blog
7.are you see  like some thing in your blog labels area like blow picture

you have almost done and successfully customize lavels widget.
If you not see above picture, you must see here blew picture and you need to edit some code in templete.

9. go templete and backup your templete and click in Edit HTML
10. SEARCH  ]]></b:skin>
Place blew code before it.
-----------------------------------------------------------------------------
/*-----Custom Labels Cloud widget by www.MyBloggerTricks.com----*/
.label-size{
margin:0 2px 6px 0;
padding: 3px;
text-transform: uppercase;
border: solid 1px #C6C6C6;
border-radius: 3px;
float:left;
text-decoration:none;
font-size:10px;
color:#666;
}

.label-size:hover {
border:1px solid #6BB5FF;
text-decoration: none;
-moz-transition: all 0.5s ease-out; 
-o-transition: all 0.5s ease-out; 
-webkit-transition: all 0.5s ease-out; 
-ms-transition: all 0.5s ease-out; 
transition: all 0.5s ease-out;
-moz-transform: rotate(7deg); 
-o-transform: rotate(7deg); 
-webkit-transform: rotate(7deg); 
-ms-transform: rotate(7deg); 
transform: rotate(7deg); 
filter: progid:DXImageTransform.Microsoft.Matrix(
                    M11=0.9961946980917455, M12=-0.08715574274765817, M21=0.08715574274765817, M22=0.9961946980917455, sizingMethod='auto expand');
zoom: 1; 
}

.label-size a  {
text-transform: uppercase;
float:left;
text-decoration: none;
}
.label-size a:hover  {
text-decoration: none;


-------------------------------------------------------------------------  

Save your templete
you successfully done 

Wednesday, October 30, 2013

How to add add profile picture under title- blogger design

your blog is looking nice after adding profile picture in title. because it become more trust able to visit
 and they start to think there is a real man behind this blog. posts are upgrade to charming look.
it is also a scope for blogger to publicity himself. because self marketing is the best marketing in the world.


===================================================
Complete blew steps you can done
===================================================

1. Go to you blog 
2. go to templete>> Edit HTMT.
3. Search  for   .post h3 or .post h2
4. you will see similer code like blew .


.post h3 {
color: #7CA2C4;
font-size: 20px;
font-family: Arial, sans-serif;;
font-weight: normal;
margin: 0px;
padding: 0px 10px 0 47px;
}
 
 
now replace this code with blew code.
-----------------------------------
 .post h3 {
background:url(IMAGE LINK OF YOUR PROFILE PIC) no-repeat top left;
color: #289728;
font-size: 20px;
font-family: Arial, sans-serif;;
font-weight: normal; height:45px;
margin: 0px;
padding: 0px 10px 0 47px;
line-height:1.1em;
}
 
------------------------------------- 
 

now edit  yellow  marked text change with your own avater or profile image link  which is about 40 px

like blew pictore size
 you successfully do this

Monday, October 28, 2013

Google Transletor tool- convert your language to others and improve your english skill

Google translator is a awesome tool of google. It help people to convert  text and document to another
language. This is a free multi-converter tool which provides us more than 70+ language.
It is help us to improve our english skill with vocabulary and grammertically.
we are easily convert any international language to our own language , that means our mother language.
It is also help to new blogger who try  grow up  their blog with little english language like.
It also help to newbies create post in effectively .

===============================================
How to use Google translator tool
================================================

Google translator is magically free tool, you can use it to convert you text or documents, its provides english , hindi, pk, china , bengeli and 70+ language.

1. Go to >> Google Translator
2. see blew picture and follow the marking instruction.
3. input language is auto detect, if you see problem, select is manually,
4. then select translated language which means your desire language
5. google translater always translated automatic according to your input, if it is not, please click on
      Translate button

How and why Add google custom search in your blogspot blog-- blogger designing

Add a google custom search engine in your blogger blog.
it help you to get blews benefits.
1. google search engic every body knows that.
2. ti is very popular name in internet.
3. google search similar word in your whole blog which is typed by visitor.
so go to start


=====================================================
Add customize custom search of google search engine by  folloing blew steps
=====================================================
1. go to here :  create custom search
2.  here you see a form  type here your blog  url and your type keywords similar to your blog
3. click on create  .
4. follow blew picture and click marked option

5. now you customize  custom search, click in  Look And feel free >> two page selected and  click save and get cod lik blew


6. copy this code and back to your blog layout and select a HTML/ javascript widget and
paste the copied code


Sunday, October 27, 2013

Add animated beautiful clock in your blogspot blog

Add animated flash clock in your blog.
 it  help you and your visitors see time when visit your blog.
it is very simple and light widget and it is create bad effect for your blog. but it increase your blog out look.
it is orginally create by 24work. so you need to go this blog for get code and there are many style clock.


================================================

Add clock in your blog by doing blew steps
================================================

1. Go to your blog and click Layout
2. add a widget
3. Add HTML/Javascript widget by click in + button
4. paste code here and then save it.

5. now save arrangement.
go to  blew link for get code
===============================================
===============================================


Saturday, October 26, 2013

How to add facebook box in blogspot with simple way.--blog designing

Facebook like box can help you to get popularity of your blog. You will see it most of blog of blogspot
platform. it is a common widget for all pro blogger.
It just for new blogger of blogspot.
now you add facebook likebox like blew


================================================================ 
Add like box by following steps ================================================================
1. go to >> Layout>> Add A New Widget
2. select  HTML/ Javascripts widget
3. copy blew code and paste it

---------------------------------------------------------------------------------------------------
<iframe allowTransparency='true' frameborder='0' scrolling='no' src='http://www.facebook.com/plugins/likebox.php?href=http%3A%2F%2Fwww.facebook.com%2Fpages%2FMy-Blogger-Tricks%2F147104632016744&amp;width=590&amp;colorscheme=light&amp; show_faces=true&amp;stream=false&amp;header=false&amp;height=180' style='border:none; overflow:hidden; width:590px; height:180px;'/>
-----------------------------------------------------------------------------------------------------


4. replace blue color text  with your link.
now a question come, how you get your page link. don't warry for get it by following steps
* first go to your page copy your page from address bar, without http://.   see blew

5. now replece back slash(/) with %2F
then it looks like blew code
www.facebook.com%2Fpages%2FTRICK-LINK%2F201883109935908


now code replace and  save widget.
Then save arrangement and enjoy.

If you face problem please comment